How to create orders
Help to the New Order request form
In this Help we will show you how to fill in correctly the request form for a new Cut Order.
Required data:
- Your reference : here you must write a descriptive short reference that identifies the order
- Your description : descriptive text of the order
Surface dimensions
NOTE: surface and pieces dimensions are in millimetres.
For the Cut Map calculation we can use one or two different cut surfaces. In this section we will insert the data corresponding to those surfaces.
- Length: longest side of the surface
- Width: shortest side of the surface
- Deburr: width of the surface edge that we will reject for the cut calculation
- Mesh orientation: in case that surface has mesh (grain)
Surface restrictions:
- Wide can't be greater than length
- Accepted values for Mesh Orientation:
- 'L' = Mesh orientation is ALONG the surface
- 'A' = Mesh orientation is widthWAYS the surface
- 'N' = Without mesh
- Surfaces with length or width less than 500 mm or greater than 6.000 mm are not accepted
Once we have inserted surface/s value/s we will set the saw width
After have completed all the mentioned instructions before mentioned, we may insert the pieces to cut: first we will insert the NUMBER OF different pieces SETS to cut and we will press the Save Pieces button.
The NUMBER OF different pieces SETS to cut is not the total number of pieces, but the pieces quantity with different dimensions to cut. Immediately after that, will appear all the checkboxes corresponding to the pieces number we set before, and (for each one) we may fill in the desired quantity, the dimensions, and the orientation mesh.

Pieces
restrictions:
- Wide can't be greater than length
- Accepted values for Mesh Orientation:
- 'L' = Mesh orientation is ALONG the surface
- 'A' = Mesh orientation is widthWAYS the surface
- Although having set those Mesh values, if mesh is NOT activated for the surface (=N) that pieces mesh orientation will not take effect. Orientation can be changed without restrictions for improving performance
- Pieces with length or width less than 15 mm are not accepted
Examples of how to fill in a piece dimensions:
Example 1
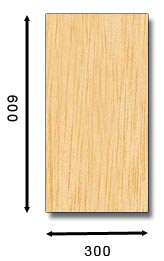
Suppose that we will want to insert the following piece:
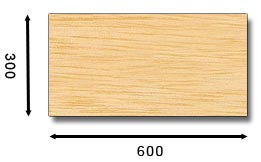
For this case, we can say that this piece has 300mm long x 600mm wide and that Mesh or Grain is wideways. As one of the restrictions for pieces is that Width can't be greater than Length, we will introduce its dimensions as follows: Length = 600, Width = 300 and Mesh = 'L'. Actually what we have done is
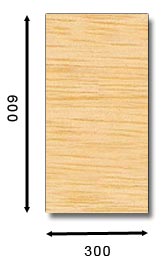
to rotate the piece's position keeping Mesh orientation.
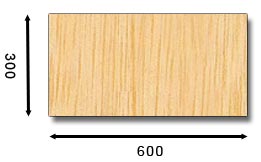
This piece is the same that the one before but rotated vertical in order to correctly fill in its dimensions in the form.
|
|
Example 2
We have the same piece that in Example 1 but with the mesh parallel to the short side of the piece:
We are in the same case than in Example 1: we will set its dimensions as if it would be the same piece:
This piece is the same that the one before but rotated
vertical in order to correctly fill in its dimensions in the form.
Length = 600, Width = 300 and Mesh = 'A'. We have rotated again the piece position keeping Mesh orientation.
|
At any time we can increase the NUMBER OF different pieces SETS to cut. In order to do this, we will set a NUMBER of SETS greater than the current one and we will press the Increase Pieces button. In case we wish a smaller NUMBER of SETS we must leave blank the remaining ones.

To end we'll press the Confirm and Send button.
After this action, you will see a summary of the Cut Order that will be sent for processing to the cut engine.
- If the Cut Order is correct, we can print it if we want. Then we should press Send to send it for processing to the cut engine.
- If we would still make modifications to the Cut Order before sending it, we can press the Back to Order button, and make the desired changes.
Go up

